
Get in touch with Ebestron Company



Updated June 2026 · Reviewed by the Ebestron technical team
You’ve already spent hundreds of hours testing different 2K adhesive formulas. You’ve narrowed it down to one, and you’re excited to bring it to your customers. Then, you start dispensing it, and what happens? The bead comes out patchy. The glue stays tacky. The bond peels off during stress testing. It’s enough to make you think you should try another adhesive. Don’t pull your hair out yet. Nine times out of 10, these 2K dispensing problems are dispensing-hardware faults – not a problem with the glue chemistry. A bad bead or weak bond usually boils down to off-ratio dispensing, poor mixing, trapped air, clogged nozzles, or leakage-all symptoms that can be traced to the 2K cartridge, dispensing gun, static mixer, or tip. This troubleshooting guide will identify the seven dispensing hardware faults that trip up our customers the most frequently. Diagnose the symptom, pinpoint the cause, fix it, and avoid wasting valuable time and resources reordering good glue. Treating your dual cartridge, dispensing gun, static mixer, and tip as a single, integrated system, will resolve most of your 2K adhesive dispensing failures.
Quick summary: If your two-component adhesive dispensed bead is out of ratio, not fully mixed, uneven, or full of air, the culprit is almost certainly in the dispensing equipment (cartridge, dispensing gun, static mixer, tip) – not the adhesive formulation. These common problems in dispensing adhesives and sealants are nearly all dispensing issues you can fix at the bench — find the part that’s failing and fix it first.
⚠️ Scope of this guide
Important: this guide focuses only on dispensing-hardware issues that affect how the adhesive is dispensed. If a bead dispenses to specification (proper ratio, mix, and bubble-free), but the bond strength still suffers, there’s likely another issue related to substrate preparation/contamination (see ASTM D2651 for metals and ASTM D2093 for plastics) or the selection of your adhesives. Those factors are beyond the scope of this troubleshooting document.
The 7-Symptom 2K Dispensing Fault Finder
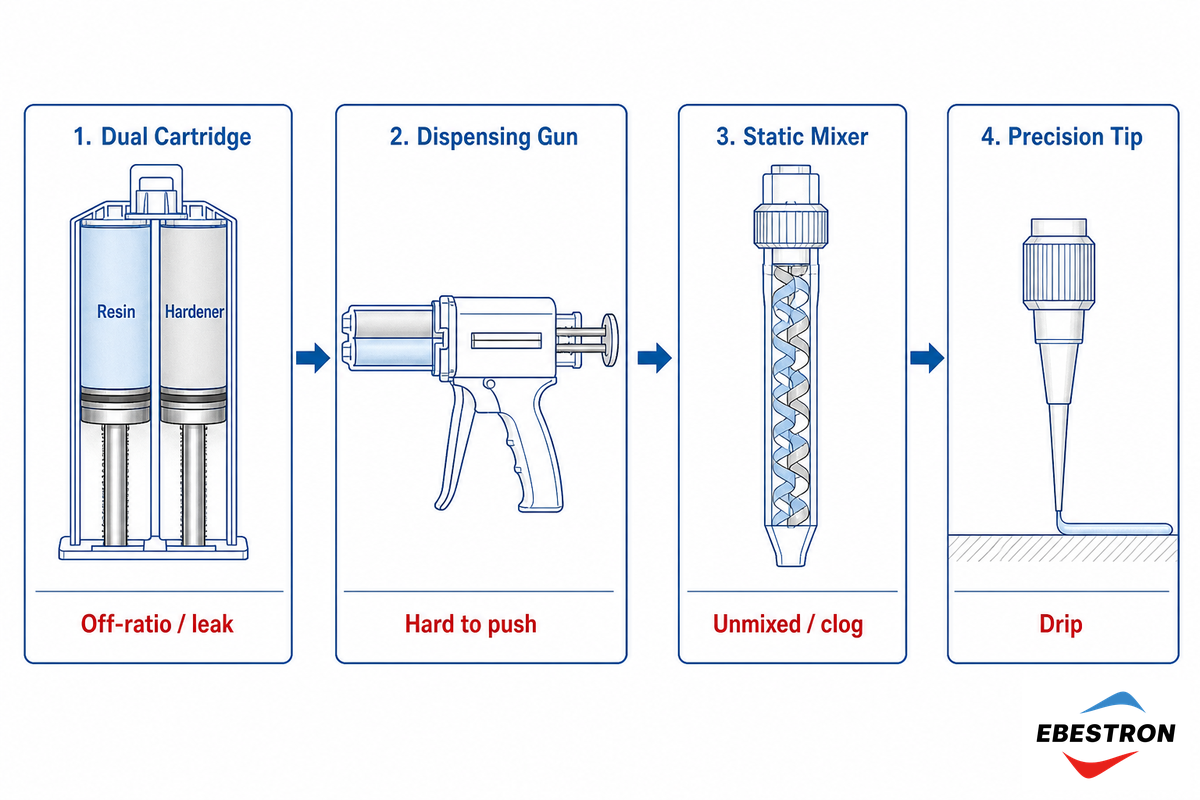
Get started by finding the problem you’re seeing with the bead in the table below, then compare it to the recommended hardware root cause, fix and target component. The diagnosis follows the standard adhesive failure-mode logic of ISO 10365; click a row for the full detail.
| Symptom at the nozzle | Most likely hardware cause | One-line fix | Part |
|---|---|---|---|
| Bond stays soft, tacky, or weak | Off-ratio first bead (unbalanced pistons) | Purge ~1 in before applying | Cartridge / gun |
| Streaky, two-toned, marbled bead | Too few mixer elements / unprimed mixer | Match element count to ratio; purge first shot | Static mixer |
| Mixer hard or solid mid-job | Pot life exceeded inside the mixer | Swap a fresh mixer; don’t idle past working time | Static mixer / nozzle |
| Bubbles or voids in the bead | Entrapped cartridge air / suck-back | Bleed the cartridge; control dispense speed | Cartridge / valve |
| Output shrinks during a run | Material thickening (pot life), not machine drift | Premix less; track working time | Cartridge / material |
| Gun too hard to squeeze or stalls | Thrust ratio too low for the viscosity | Use a higher thrust-ratio or pneumatic gun; warm the material | Dispensing gun |
| Adhesive oozes after you release | Residual back-pressure, no suck-back relief | Use an anti-drip gun; right-size the tip | Gun / tip |
| One side leaks or won’t extrude | Piston blow-by or cured plug in one chamber | Inspect piston seal; replace cartridge | Dual cartridge |
| Components cross-contaminate | Shared probe / swapped cap prongs | Separate tools per side; keep cap orientation | Cartridge / cap |
| Cap bonded permanently to cartridge | Resin and hardener swapped at the cap | Note prong orientation before recapping | Cap |
| Nozzle clogs between shots | Idle dwell longer than pot life | Cap a fresh mixer; shorten idle gaps | Nozzle |
| Bead fine, bond still fails | Not a dispensing fault — substrate prep | Check surface prep (ASTM D2651/D2093) | Substrate (out of scope) |
Problem 1: The Bond Stays Soft, Tacky, or Weak (Off-Ratio Dispensing)
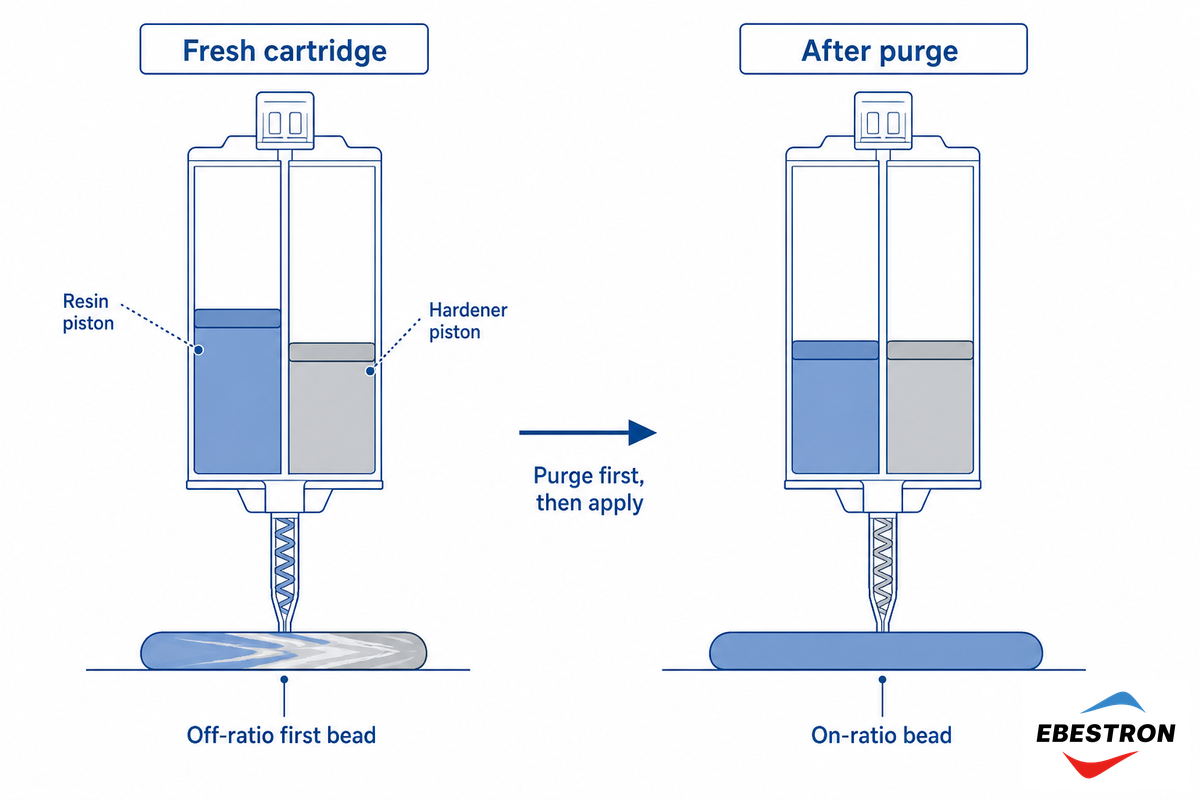
Tacky Bead or Weak Bond. What it looks like: The first inch or two of a fresh dual-component bead dispensed from the cart or the dispensing gun will often vary. It can start with more hardener (yellow) or more resin (clear/off-white), depending on the geometry of the two internal cartridges. But soon, it becomes evened out, typically running right up. If the initial bead doesn’t reach even mixing and bonding quickly, those first few inches of bead-and often the rest of the bead coming off that specific cart in that dispenser-will have less hardener or resin than needed, and will likely be weak or even remain tacky. The fix is a simple manual step: the bead mix evenly just before the outlet, so purge an inch or so onto a clean paper towel before applying to the joint. This one is easy to misread, because the problem fixes itself after the first few inches of a fresh cartridge.
Why does the mix ratio matter so much? Any variation off from the published 1:1, 2:1, or 4:1 ratio causes the crosslinking reaction in a two-component epoxy, urethane, or silicone adhesive to fail. The result can range from minor surface tackiness to a nearly completely uncured joint. Because the ratio drives curing, industry packaging guidance stresses holding the ratio constant all the way from manufacturing through storage to application. Failures inside the joint, whether the glue delaminates from a surface (adhesive failure) or splits within itself (cohesive failure) for lack of full cure, trace back to the mix ratio, which is why even a few percentage points off ratio can have outsized consequences for final bond strength.
📐 Engineering Note
Most 2K polyurethane adhesives contain isocyanates and dispensing requires a handling consideration as well. They-TDI, MDI and the others-can sensitize the lungs, with a OSHA exposure limit ceiling of 0.02 ppm for TDI; NIOSH calls for ventilation and respiratory protection; a supplied-air respirator for spray applications. Low exposure is achievable in a closed cartridge system; open 2K-PU dispensing, not so much.
What to remember is that a tacky 2K bond starts as an on-ratio problem. Purge a preliminary bead, test the system to ensure the pistons are moving evenly, and then investigate the chemical reaction. Match the right hardware to the job with two-component dispensing guns and cartridges built for 2K use.
Problem 2: Streaky, Two-Toned, or Unmixed Adhesive (Static Mixer)
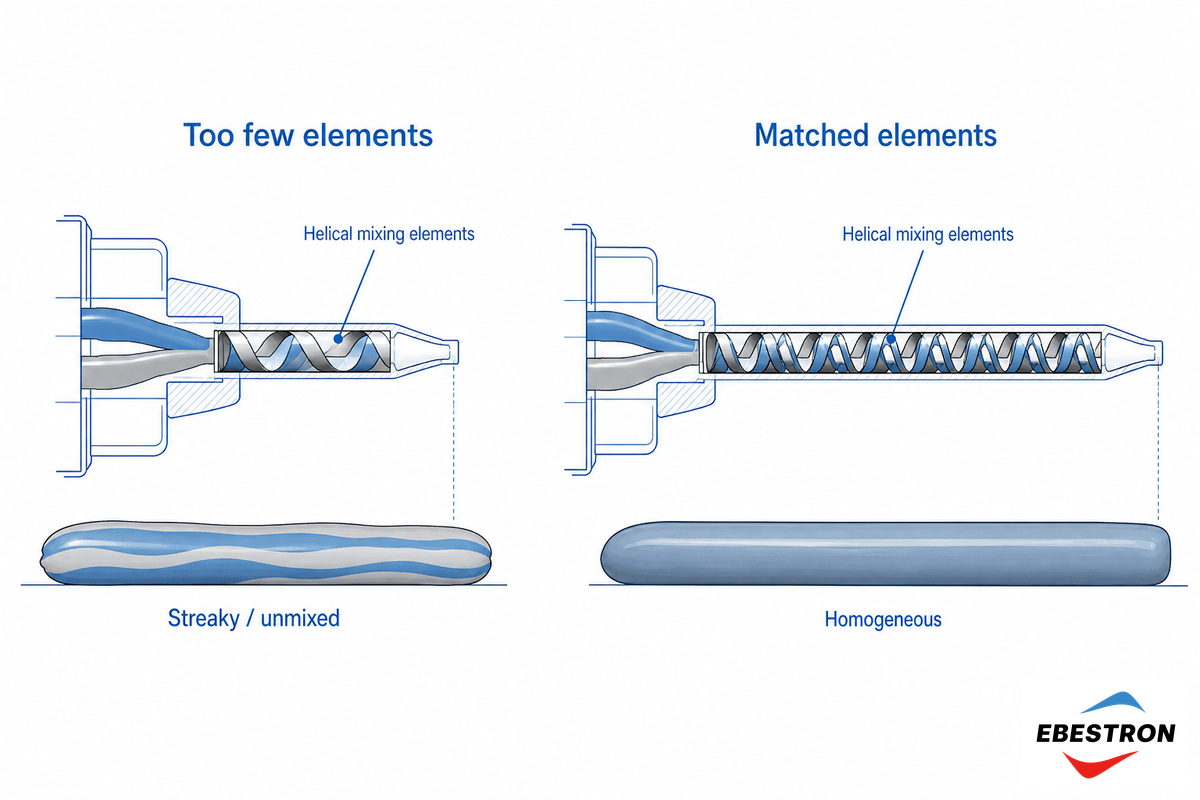
A bead that come out streaked or two-toned and then won’t fully cure means the two components didn’t mix properly as they exited the nozzle. The usual cause is too few mixing elements on the static mixer for the ratio. Each element in the mixer divides and recombines the stream, so a proper mix depends on matching the element count and mixer configuration to the ratio you’re running.
Why is the adhesive not mixing evenly?
The element count must match the ratio, not just be “long enough.” In practice, most disposable static mixers run roughly 16–24 elements, and a wide ratio or a large viscosity gap between the two parts calls for more, not fewer. Patent literature for two-component sealants notes that a 1:1 mix may need on the order of 24 elements to fully homogenize, while some simpler materials mix in fewer.
The counterintuitive trap: more isn’t always better — too many elements raise back-pressure and can stall or clog the shot, so match the count to the ratio rather than maximizing it.
| Mix ratio (A:B) | Typical element count | Note |
|---|---|---|
| 1:1, low viscosity gap | ~16–24 elements | Easiest to mix; over-elementing wastes material |
| 2:1 to 4:1 | ~24 elements | Standard band for most epoxies |
| 10:1 or wide viscosity gap | More elements / longer mixer | Hard part to fold the minor component in |
A method to determine if the problem resides on the mixer is to perform the field test of isolation. Insert a new nozzle and dispense. If the streaks disappear then the problem resides on the initial mixer. Otherwise it’s more likely on the gun, or on the cartridge. Likewise, don’t pay attention to the first centimeter (about 0.4 inches) because no static mixing tube or nozzle will perform a perfectly homogeneous mixture in the first stretch of tubing, and you can see the streaks.Find more selection options here-based on ratio and number of mixing elements-including epoxy mixing nozzles.
Problem 3: The Static Mixer or Nozzle Cures Solid Mid-Job
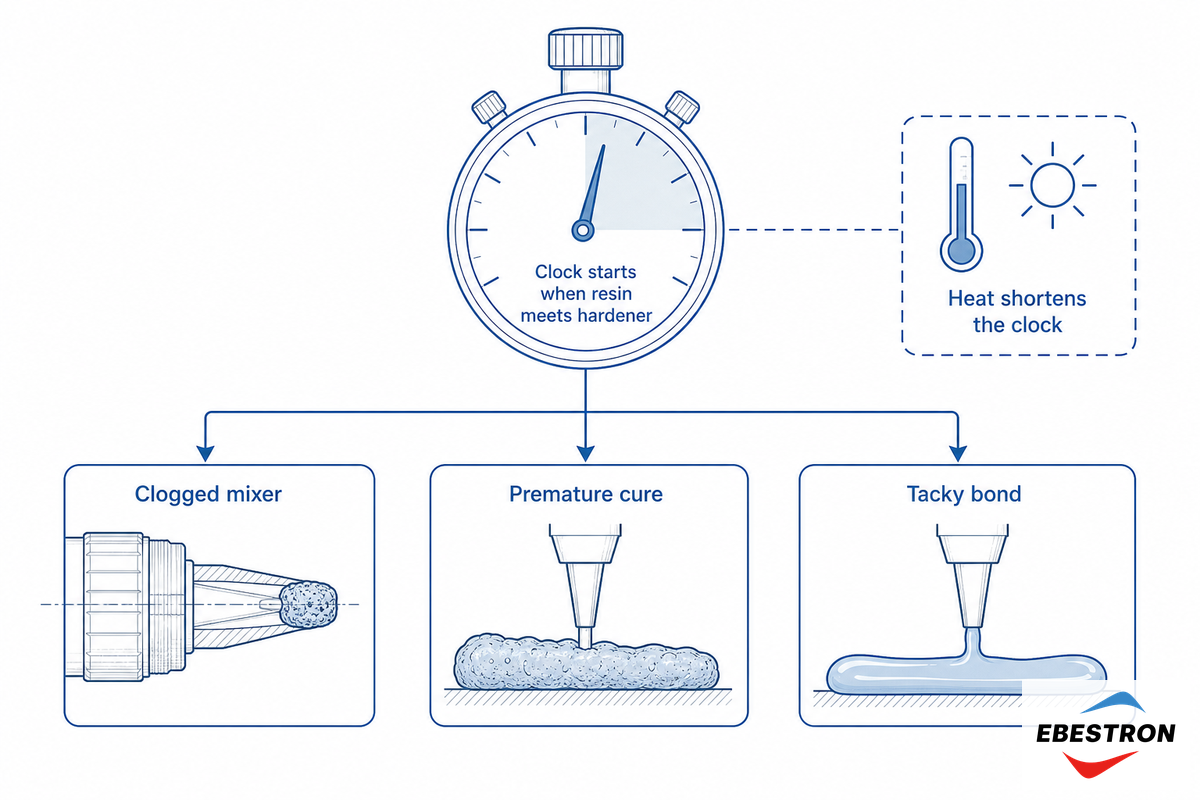
A mixer that cures during application and/or stops mixing on insertion between successive applications to clog and fill with cure solids almost never indicates a bad part; rather, it simply means the working life of the material within the mixing nozzle has been exceeded.
The Pot-Life Clock
Think of pot life as a clock that starts the instant resin and hardener meet at the mixer inlet, not when you pull the trigger. Working life is always shorter than the published gel time and the full cure time, and ambient temperature shortens it sharply — heat brings on premature curing. As a field example, a 10-minute pot life at 23 °C can fall to roughly 5 minutes at 31 °C, so a warm shop floor silently halves your working window inside the mixer.
Leave that mixture longer than the pot life and it cures in the mixing element itself. It’s a defined parameter – in use, even ISO 10364:2024, current edition, defines standard tests for measuring the working/pot life of multi-component adhesives – so use the published number as the maximum permissible time in the mixer, not a suggestion.
Why is my adhesive cartridge clogging?
Two things clog a static mixing nozzle: dwelling too long between shots (past the pot life), or running too many mixing elements for the product viscosity, which raises back-pressure until the shot stalls. Either way the adhesive gels inside the mixer before you clear it, and a fresh nozzle is the only real cure.
The field fix is to treat the static mixer as a disposable wear item — skip the cleanup and replace components instead. Let a spent mixer cure overnight and swap it before your next application; keeping a few spare two-component static mixers on hand makes a clog a 10-second swap, not a scrapped cartridge.
Problem 4: Air Bubbles and Voids in the Bead
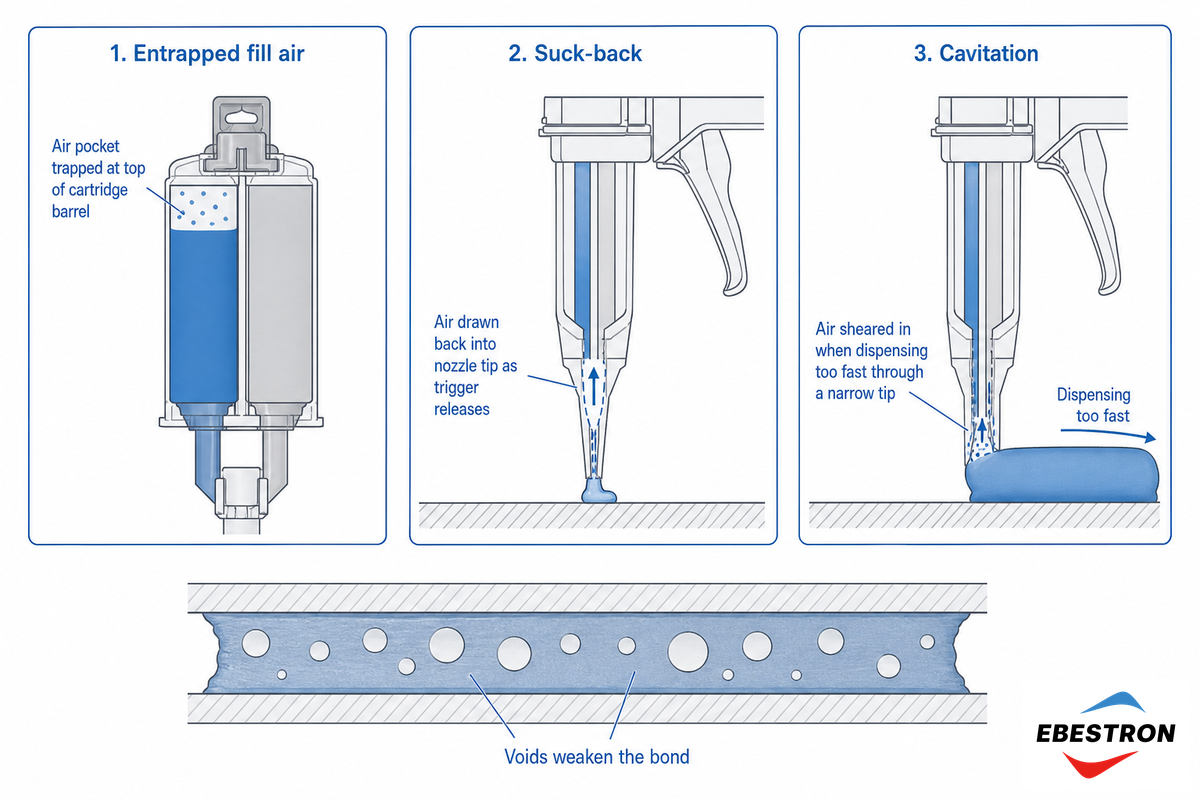
Bubbles in the bead aren’t just cosmetic. Entrapped air leaves voids that cut the mechanical strength of the cured joint, and in electronics potting they open a path for moisture ingress and field failure. In a two component application, there are three hardware sources of air in the dispensing system – all are easily addressed.
- Entrapped Fill Air In Cartridge Air trapped at the head of a 2 component cartridge will compress as fluid is drawn from the nozzle, leading to an uneven mix. The leading edge of your bead will be rich in one part and the trailing edge rich in the other. Test your cartridges; if you can compress the cartridge plug when the dispensing gun trigger is released, you’ve trapped fill air which must be bled out prior to applying your material.
- Suck-Back at Trigger Release A slight inward air draft can occur as the dispense pressure is released when the trigger is let go. A proper, anti-drip (sometimes called pressure-relief) dispense gun will eliminate this tendency.
- Cavitation During Dispense Dispensing very high viscosity fluids at a high flow rate, or under too much air pressure on a pneumatic gun, can pull an air pocket into the tip; the shearing leads to an inconsistent blend. Excess high pressure makes it worse, so slow the flow rate or open up the dispense tip diameter.
Industry coverage of entrapped air in dispensing reaches the same conclusion: it comes from fill procedure and dispense speed, not the mixer. A good rule of thumb? If your dispensing application is creating bubbles, look to your cartridges and dispensing equipment before assigning blame to the static mixer.
Problem 5: The Gun Is Too Hard to Squeeze or Stalls
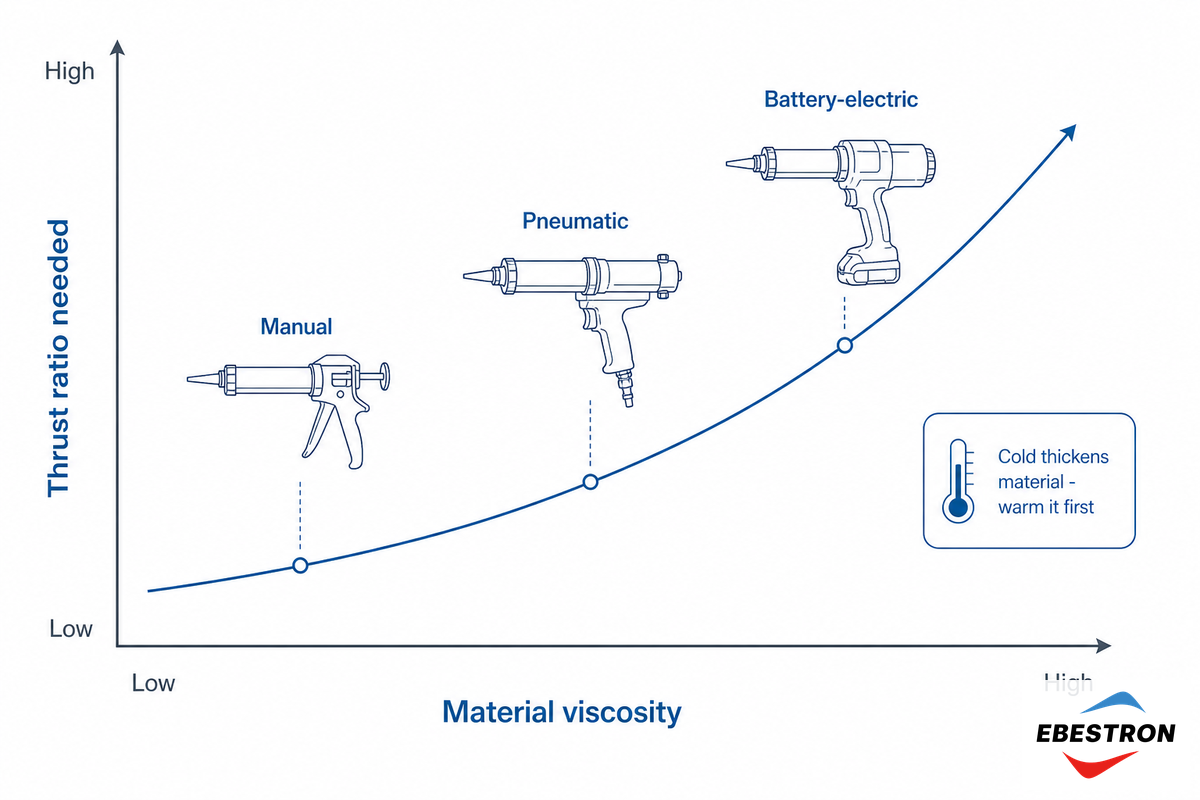
Trouble pushing a gun by hand, or it drags as it empties? In manual dispensing, odds are the thrust ratio is insufficient — a pneumatic gun would just raise the air pressure (in psi) instead: It’s just not applying enough mechanical advantage to the viscosity of the adhesive and the force of the cartridge’s plunger. The thrust ratio is pretty much just how much force the gun can supply per ounce of hand pressure; more is better for pushing thick stuff or pushing a big cartridge hard. Viscous adhesives, large cartridges (400- to 600 mL), and wide mix-ratios increase resistance. The physics is steep: resistance to flow through a round tip, described by the Hagen-Poiseuille relation from fluid mechanics, scales with material viscosity and flow length but with the inverse fourth power of the tip radius, so dropping one tip size can multiply the force the gun must deliver. There is even a standardized way to measure it: ASTM C603 defines an extrusion-rate test for exactly this force-versus-material behavior.
Choosing for dispensing force — a quick routing
- Low-viscosity, 50-200 mL, 1:1-any standard hand gun will do.
- High-viscosity or 400–600 mL cartridge, step up to a higher-thrust-ratio hand gun (commonly 18:1 to 26:1 for stiff, high-viscosity material), or move to pneumatic cartridge guns to remove operator fatigue.
- High-volume or repeatable beads, consider battery-electric cartridge guns for a steady, fatigue-free stroke.
But before moving to a bigger gun, don’t forget temperature: Cold material is significantly more viscous. Your instinct to ‘keep it cool’ works against you with viscous adhesives. Try a 10-C (18-F) increase and a high-viscosity material can go from too-difficult-to-push to a pleasant glide. Warm the adhesive — bringing the cartridge to room ambient temperature — often solves “weak gun” symptoms without equipment upgrades and gives more repeatable amounts per pull; check the product data sheet and aim for 23 C (73 F). Because thrust ratio is very dependent on both material and device, it’s best to compare values on those two parameters rather than Rely on general rules of thumb alone.
Problem 6: Dripping and Oozing After You Release the Trigger
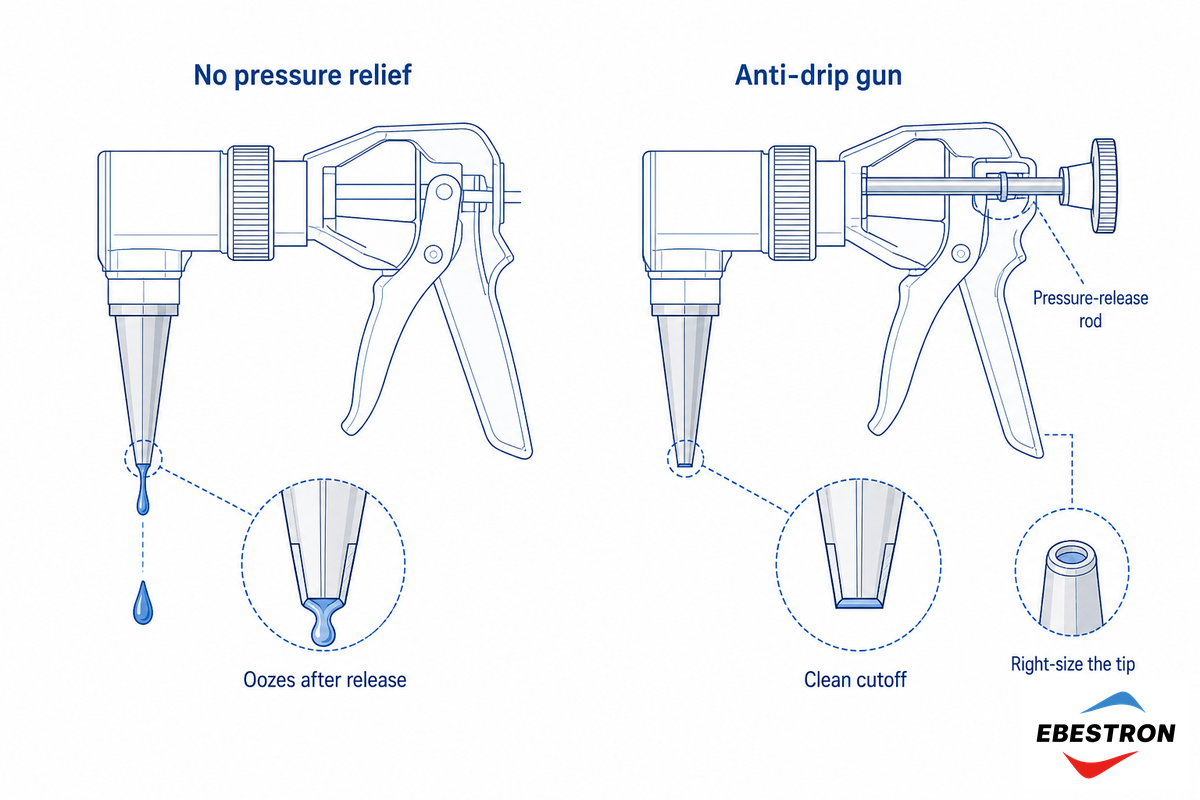
Adhesive left oozing out from the tip after you stop pushing wastes material and degrades appearance. That flow is caused by residual pressure trapped within the cartridge. Pressure that remains on the back of the cartridge pushes more sealant out even after the trigger stop. The gun must include a pressure-release (or anti-drip) mechanism. The principle is well established: a common anti-drip dispensing valve design uses a piston-sealed, reciprocating rod that closes off flow through the nozzle the instant the stroke stop.
Tips contribute as well. An oversized tip ID — say a 1.6 mm bore where 0.8 mm would do — holds an over-generous slug of pressurized material that bleeds out after release; right-sizing the tip ID to the bead significantly reduces oozing. Tips and nozzles also come in different materials — stainless steel for abrasive coatings, and polymer tips in PTFE/Teflon, polyethylene, polypropylene, or nylon chosen for chemical compatibility, since an incompatible plastic can swell or react; confirm the luer fitting or connector matches your cartridge. For critical applications where precise placement is key, a small-gauge precision tip, a 32-gauge tip lays a bead about 0.15 mm (0.006 in) wide, improves placement and cuts post-dispense weeping; see our dispensing needles and precision tips. Just remember, the idea is to stop the drip at the device and tip, not by squeezing more softly.
Problem 7: Cartridge Leakage, Piston Blow-By & A/B Cross-Contamination
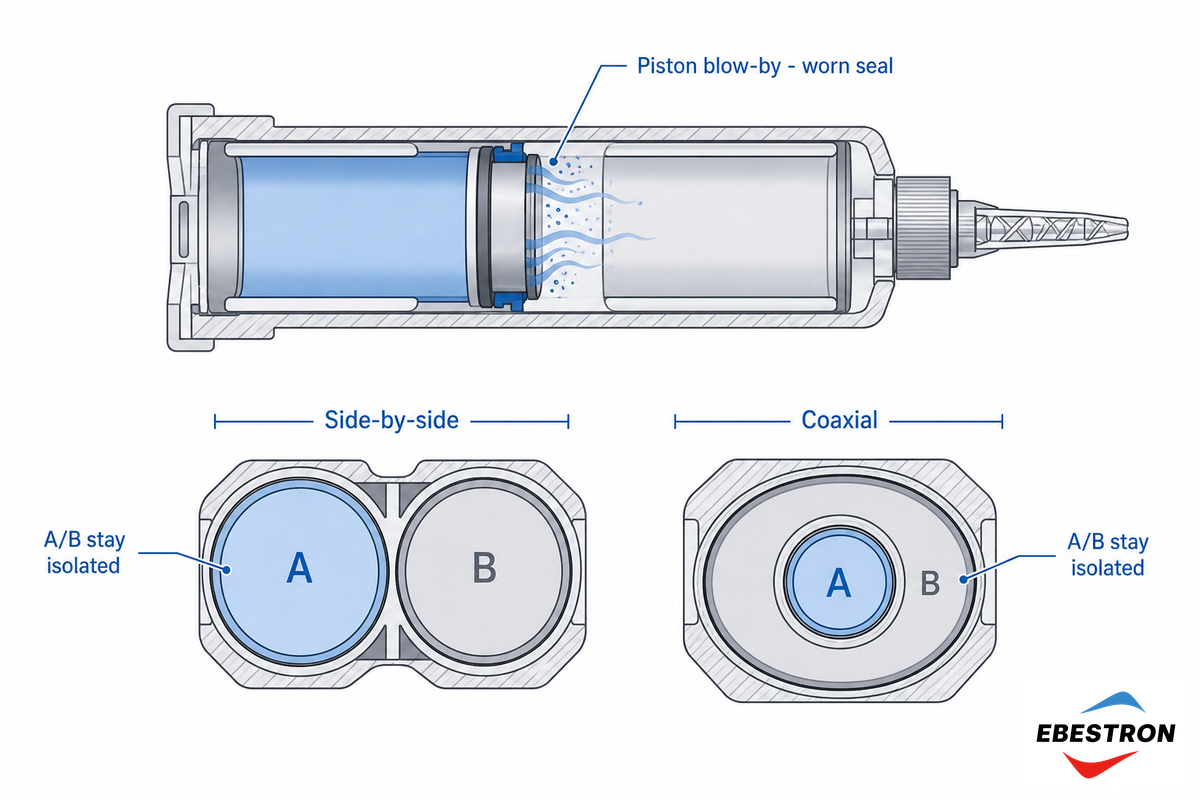
If one channel is leaking, isn’t extruding cleanly, or has compromised cross contamination, the issue is usually with the cartridge’s seal on its components or on one of the pistons.
Why won’t resin come out of one side of the cartridge?
Two failure modes dominate. Piston blow-by: a worn or over-pressured piston (plunger) seal lets material leak past the plunger instead of out the nozzle, so that chamber dispenses lean or not at all. Or a cured plug: if one component dried in the mouth, the gun pressurizes against a solid stopper and nothing moves.
Dual-cartridge guns keep A and B segregated until the static mixing nozzle; patent literature on dual-component dispensing shows piston seals driving both components separately toward the mixer, while multicomponent cartridge designs use matched piston geometry to hold the ratio. Side-by-side and coaxial cartridges — commonly 50, 200, 400, and 600 mL — protect A and B differently, so they fail differently: blow-by is harder to spot on a coaxial inner chamber than on a side-by-side, where you can see the lean barrel lagging by several mm.
Cross contamination is usually “self-inflicted,” typically via the cap. Note which prong enters which half of the nozzle port before pulling the cap off-swap them, and residue from both components begins mixing. Gel it will forever seal the cartridge. If the nozzle must be poked, use a different tool on each side of the port; the entire twin cartridge unit should be discarded or replaced.
The 60-Second 2K Dispensing Triage
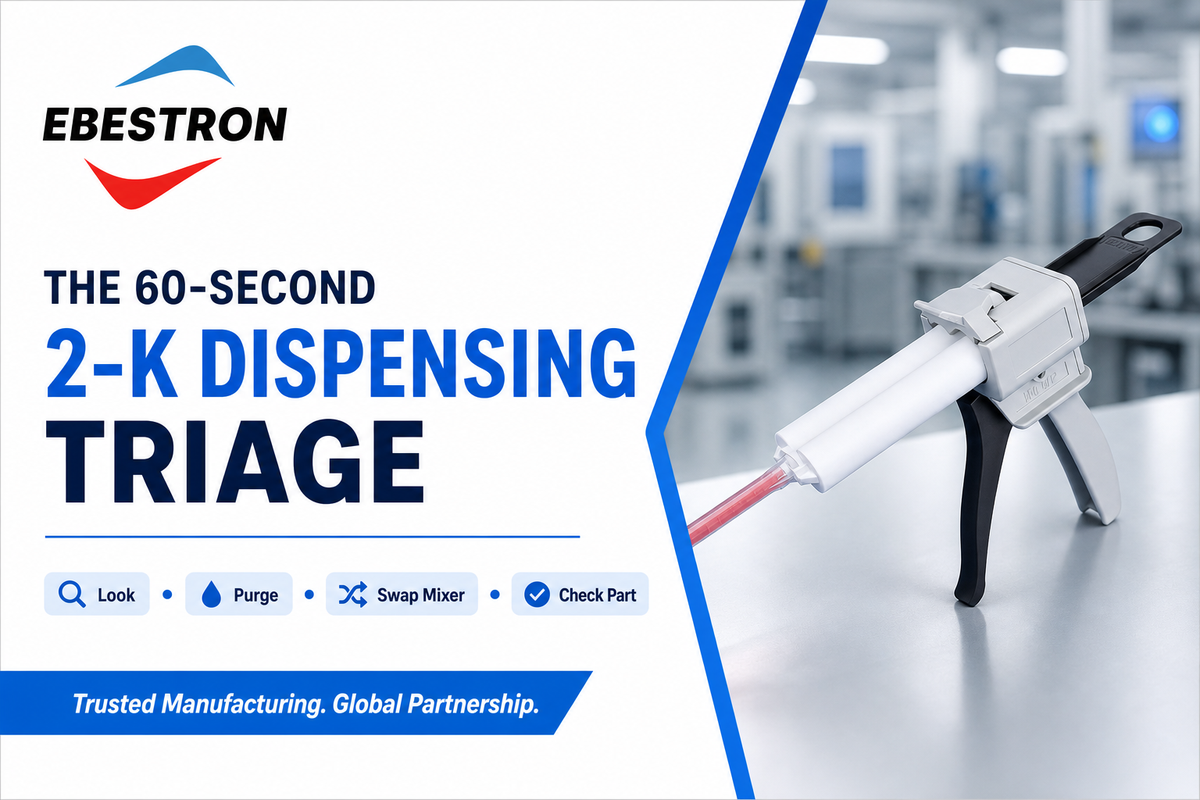
When a bead go wrong on your production line, don’t guess – trace the symptom to a hardware component in under a minute. This sequence test one “layer of failure” at a time, from broadest to narrowest.
The 60-Second 2K Dispensing Triage
- Look for streaky/two-tone mixing; bubbles; nothing or thin on one barrel.
- Purge a length of bead. If first is bad and second is good, it’s an unprimed mixer or out-of-balance pistons, not faulty chemistry.
- Put in a new mixer/nozzle. if old one is ok, then gun or cartridge is faulty.
- Apply more pressure to the gun. Warm the parts. Or install a gun with higher displacement per pull of the trigger.
- Check piston blow-by or cured plug. If any exists, replace the cartridge.
Symptom-to-Part Diagnostic Index
Because a dual-component dispensing gun represents four consumable layers-cartridge, static mixing nozzle, tip and gun-identifying which component is responsible for each symptom is half the fix. This index shows how.
| Symptom | Owning part class | First check |
|---|---|---|
| Tacky / weak bond | Cartridge (pistons) | Purge first bead |
| Streaky / unmixed | Static mixer | Element count vs ratio |
| Clog / hardened mixer | Static mixer (pot life) | Idle time vs working time |
| Bubbles / voids | Cartridge / valve | Bleed air; dispense speed |
| Hard to squeeze | Dispensing gun | Thrust ratio; temperature |
| Drip after release | Gun / tip | Anti-drip; tip ID |
| Lean / leaking side | Dual cartridge | Piston seal; cured plug |
| Cross-contamination | Cap / probe | Separate tools per side |
| Tailing / stringing | Tip / viscosity | Tip cut; cut-off technique |
Industry Outlook: Why Getting 2K Dispensing Right Matters More in 2026

The stakes for a clean two-component bead are rising, but not necessarily in dollar figures of gun, mixer or cartridge units alone. The trend is toward safety-critical applications, including bonding and heat management in electric vehicle batteries, and potting of electronics components, in which a microvoid around a lead become a potential source of moisture ingress and ultimate field failure. In such high-consequence uses, a single misapplied or voided bead can mean more than a scrapped part; it can become a warranty or even a safety event, altering buying habits to place dispensing hardware reliability-ratio control, void elimination, consistent mixing-top of mind.
The biggest challenge of dispensing two-part adhesives is staying “on ratio.”
The response from the industry is monitoring and automation. Closed-loop meter-mix systems can now maintain ratio to within ~1% by volume and display it along with real-time mix-quality sensors such as 3M’s Adhesive Mix Monitor introduced in 2024 to verify quality prior to dispensing to the part. Standards keep up too, with a revision of the ISO 10365 standards in 2022. This is what that all means for you, the buyer: if you’re hand dispensing now, ensure you pre-qualify your gun thrust ratio and mixer element count to the material before scaling up your production process; if you are dispensing by volume, consider using a monitored or meter-mix dispenser. See our dynamic mixing systems for 2K sealants article for where the hardware is heading.
Frequently Asked Questions
Q: Why is my 2K adhesive not curing or still tacky?
View Answer
Most often it dispensed off-ratio. On a fresh cartridge the two pistons sit slightly unbalanced, so the first bead runs resin- or hardener-rich and never fully cures — purge about an inch first. Other causes are an unprimed or under-elemented static mixer leaving the parts unmixed, a cold shop slowing the cure, or adhesive past its shelf life. If the bead is on-ratio and fully mixed yet still tacky, the cause is the chemistry or the substrate, not the hardware.
Q: Why is the adhesive coming out streaky or two-toned?
View Answer
Streaking means the resin and hardener left the nozzle unmixed. The usual cause is too few mixer elements for the ratio, or a fresh mixer you haven’t purged yet — the first inch always reads streaky until it primes. Fit a mixer with the right element count and purge the first shot before you apply.
Q: Why does my static mixing nozzle keep clogging?
View Answer
Pot life inside the nozzle has run out. Working life is shorter than the published gel time and heat shortens it further — a 10-minute pot life can fall to about 5 minutes in a warm shop — so adhesive sitting idle between shots gels inside the static mixer. Treat the mixer as a consumable: snap on a fresh one to restart, rather than trying to clean a mixer where the mix has already gelled and hardened.
Q: When should I replace a cartridge or mixing nozzle?
View Answer
Replace the mixing nozzle every time it gels — after an idle gap past the pot life, or whenever it cured between shots; it is disposable. Replace the cartridge when a piston seal blows by, or when one chamber is too hard to extrude.
Q: Can storage and temperature affect 2K dispensing?
View Answer
Strongly. Heat shortens working time inside the mixer — a 10-minute pot life at 23 °C can fall to about 5 minutes at 31 °C — so a warm shop clogs mixers faster. Cold does the opposite to flow: it thickens the adhesive, so a chilled high-viscosity grade reads as a weak gun. An expired or separated cartridge dispenses off-ratio even with perfect hardware. Bring cartridges to room temperature and respect the shelf life.
Q: Why won’t anything come out of one side of the cartridge?
View Answer
Usually one of two things: a component cured into a solid plug at the mouth, or a piston seal is blowing by so material escapes past the piston instead of out the nozzle. Check the caps weren’t reversed; if a seal failed, replace the cartridge.
Match the right consumable to your 2K job
Ebestron supplies Mixpac, Nordson and 3M compatible dual cartridges, static mixers, dispense guns and precision tips – so you can fix the hardware problem not the symptom.
About This Troubleshooter
This guide was created by analysing failure modes our clients report in our lines of dual-cartridge, static-mixer, dispense gun, and precision tip hardware and cross-referenced using ISO 10365 failure designations, USPTO patent descriptions for static mixers and anti-drip valves and NIOSH and OSHA handling and best practice guides. Given that Ebestron supplies both hardware and consumable 2K cartridge products across all four product categories, this diagnostic procedure correlates specific symptoms to specific hardware rather than to specific product line and so can be used for Ebestron, Mixpac, Nordson and 3M devices.
Checked and reviewed by Ebestron technical team.
References & Sources
- ISO 10365:2022Adhesives: Designation of main failure patterns, International Organization for Standardization
- ASTM D2651-01(2024) — Standard Guide for Preparation of Metal Surfaces for Adhesive BondingASTM International
- ASTM D2093-03(2017) — Standard Practice for Preparation of Surfaces of Plastics Prior to Adhesive BondingASTM International
- ISO 10364:2024, Structural adhesives: Determination of the pot life (working life) of multi-component adhesivesInternational Organization for Standardization
- ASTM C603-14(2019) — Standard Test Method for Extrusion Rate and Application Life of Elastomeric SealantsASTM International
- Geometry and Fluid Flow (Hagen, Poiseuille relations)Georgia Institute of Technology
- Isocyanates, Health Hazards and Exposure LimitsU.S. Occupational Safety and Health Administration
- Isocyanates, Workplace Safety and Health TopicNIOSH / U.S. CDC
- Towards Reliable Adhesive Bonding: Mechanisms, Defects, and Design ConsiderationsU.S. National Library of Medicine (PMC)
- US5611956, Two-component sealant / static mixer element countUSPTO via Google Patents
- US2839226A, Anti-drip dispensing valve and nozzleUSPTO via Google Patents
- US7144170B2, Dual-component dispensing and mixing systemUSPTO via Google Patents
- US7997450B2, Multicomponent cartridgeUSPTO via Google Patents
- Precision in Packaging: Meeting the Demands of 2K Adhesive SystemsAdhesives & Sealants Industry
- The Evils of Entrapped AirAdhesives & Sealants Industry
- New Technology Monitors Quality of the Meter-Mix Process for Two-Part AdhesivesASSEMBLY Magazine
Related Articles
- How to Choose a 2K Dispensing Gunmatch thrust ratio, drive type, and cartridge to your material
- Static Mixing Nozzle Typesconnection styles and how to identify the right mixer
- Static vs Dynamic Mixing for 2K Adhesives — when to move beyond a static mixer
- 18 vs 24-Element Static Mixers — how element count drives mix quality and waste
- Industrial Epoxy Gun Buyer Guide — manual, pneumatic, and battery-electric compared


![Dynamic Mixing Systems for 2K Sealants [Guide]](https://adhesivespackage.com/wp-content/uploads/2026/10/dynamic-mixing-systems-for-2k-sealants-guide-featured-1-150x150.png)